MRI Safety: A Closer Look at Key Factors In Managing Radiofrequency Exposure
Emphasizing optimal balancing of patient safety and image quality, these authors discuss the impact of the specific absorption rate and B1+rms parameters upon radiofrequency exposure with MRI exams.
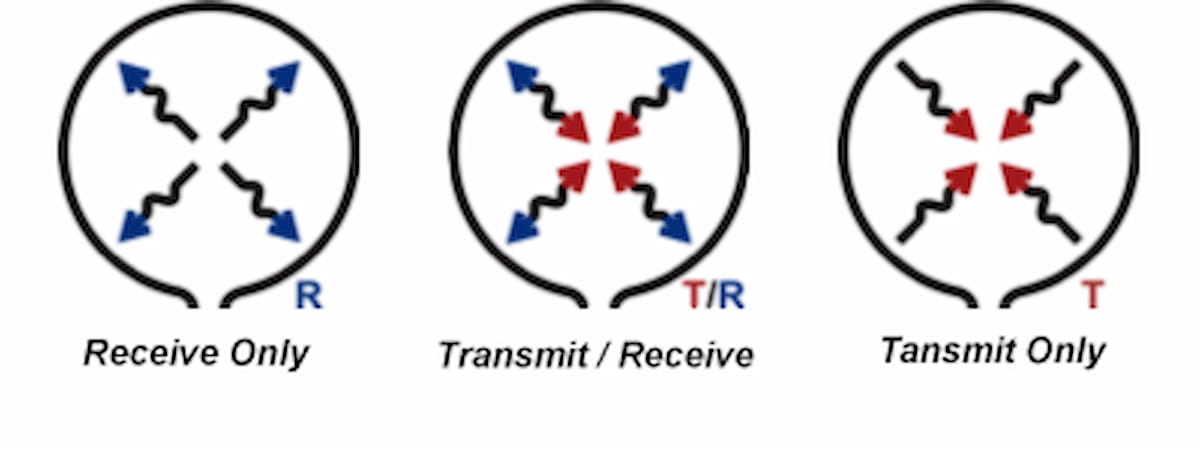
Radiofrequency (RF) stimulation is essential in magnetic resonance imaging (MRI) to excite nuclei and generate images. Radiofrequency coils are used to both transmit the necessary RF energy (transmit coils) and to receive transmitted energy (receive coils). There are also transmit/receive coils (T/R coils) that contain both functions. Today, commercial T/R coils are generally limited to head coils, knee coils, and some foot-ankle coils. It is important to note that not all head or knee or foot coils are T/R coils. In fact, most coils will be receive-only coils dependent upon a separate transmitting RF coil to provide the excitation.
When using receive-only coils (placed on or around the anatomy being imaged), the transmit coil (sometimes referred to as the “body coil”) is located circumferentially around the patient, built into the bore of the MRI behind the plastic walls/ceiling/floor, and is designed to provide a fairly uniform excitation field around the magnet's isocenter. While there are radial “hot spots” of RF transmission within the patient-accessible regions of the bore that can increase skin burn risk for the patient, central to the bore, along the central z-axis, the RF power decreases as you move superior or inferior from isocenter.
Electrical conductors, particularly insualted leads, within the volume of RF transmission can experience induced electrical currents and resulting heating, posing additional risks.


Here is standard graphic iconography from the International Electrotechnical Commission (IEC) for the radiofrequency coil types: receive only, tramsmit/receive and transmit only.
Radiofrequency exposure in MRI exams requires careful evaluation to ensure patient safety, especially for those with MRI conditional implantable medical devices. Central to this evaluation are the SAR (Specific Absorption Rate) measured in watts per kilogram (W/kg), and the root mean square (rms) value of the B1+ field (B1+rms), which is measured in microtesla (µT), respectively. These two parameters, while sharing some fundamental characteristics related to RF, are distinct in their application and purpose, offering different perspectives on managing RF exposure during MRI exams.
Before delving further into B1+rms, it is crucial to understand the concept of root mean square (RMS) value. The RMS value is a statistical means of averaging values that vary with both positive and negative values as with sinusoidal waves from transmitted RF energies. B1+rms represents the root mean square of that part of the B1 magnetic field that can produce usable signal for imaging, thus reflecting the average intensity of the positive rotating B1 field generated by the RF transmission coil during an MRI sequence.
A critical aspect of MRI patient safety is managing RF exposure to prevent induced focal heating in tissues surrounding the devices. While deployed to address the risk of diffuse temperature elevation, the specific absorption rate (SAR), for many years, was the only RF energy parameter available for use in most clinical MRI systems. By default, SAR became the parameter for characterizing focal heating risks, even though it was not particularly well suited for this application.


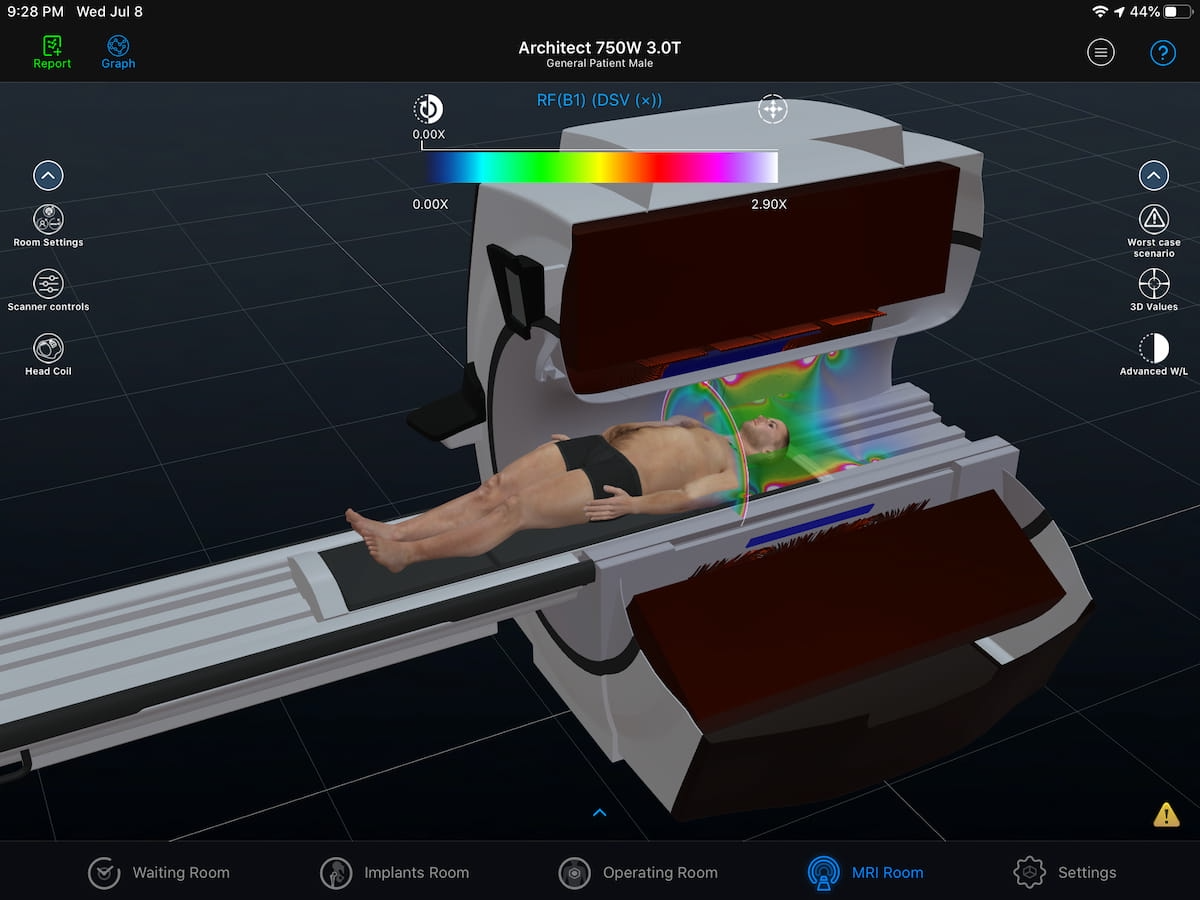
Here is a rendering of a patient with colorized axial, coronal and sagittal radiofrequency (RF) energy distribution with an unloaded RF transmitting body coil. (Image courtesy of MagnetVision and Emanuel Kanal, MD, FACR, AANG)
The SAR is a measure of the rate at which RF energy is absorbed by materials, including human tissues. In MRI, SAR is estimated by system software and calculated for each sequence, based on the tissues within the volume of RF transmission and the habitus and mass of the patient. Specific absorption rate is proportional to the square of the resonance frequency, meaning that – for any given flip angle – a doubling of the field intensity (and associated Larmor frequency for RF transmission) will result in a quadruple increase in SAR. Additionally, SAR is proportional to the square of the RF pulse amplitude – such that a doubling of a flip angle will result in a quadruple increase in SAR – and proportional to the fifth power of the patient's circumference and average conductivity.
B1+rms and SAR are not the same thing. While SAR is an estimation of the energy absorbed by the patient, B1+rms is a measure of the energy available to generate excitation signal and is independent of the patient. They each measure RF, but in very different ways. For example, sending a SAR of 4 W/kg to a 60 kg patient exposes them to 240 W of total absorbed RF energy while sending a SAR of 0.5 W/kg to a 160 kg patient corresponds to 80 W of total absorbed RF energy.
This demonstrates how, in certain cases, applying higher W/kg values still results in an overall lower total energy exposure due to the patient’s lower body mass. By contrast, a pulse sequence with the same time to echo (TE), time to repetition (TR), and flip angles will produce the exact same B1+rms on different exams of the same patient, exams of different patients, and even exams performed on MRI scanners from different manufacturers of the same field strength. This dynamic underscores a certain universality offered by the B1+rms parameter compared to SAR.


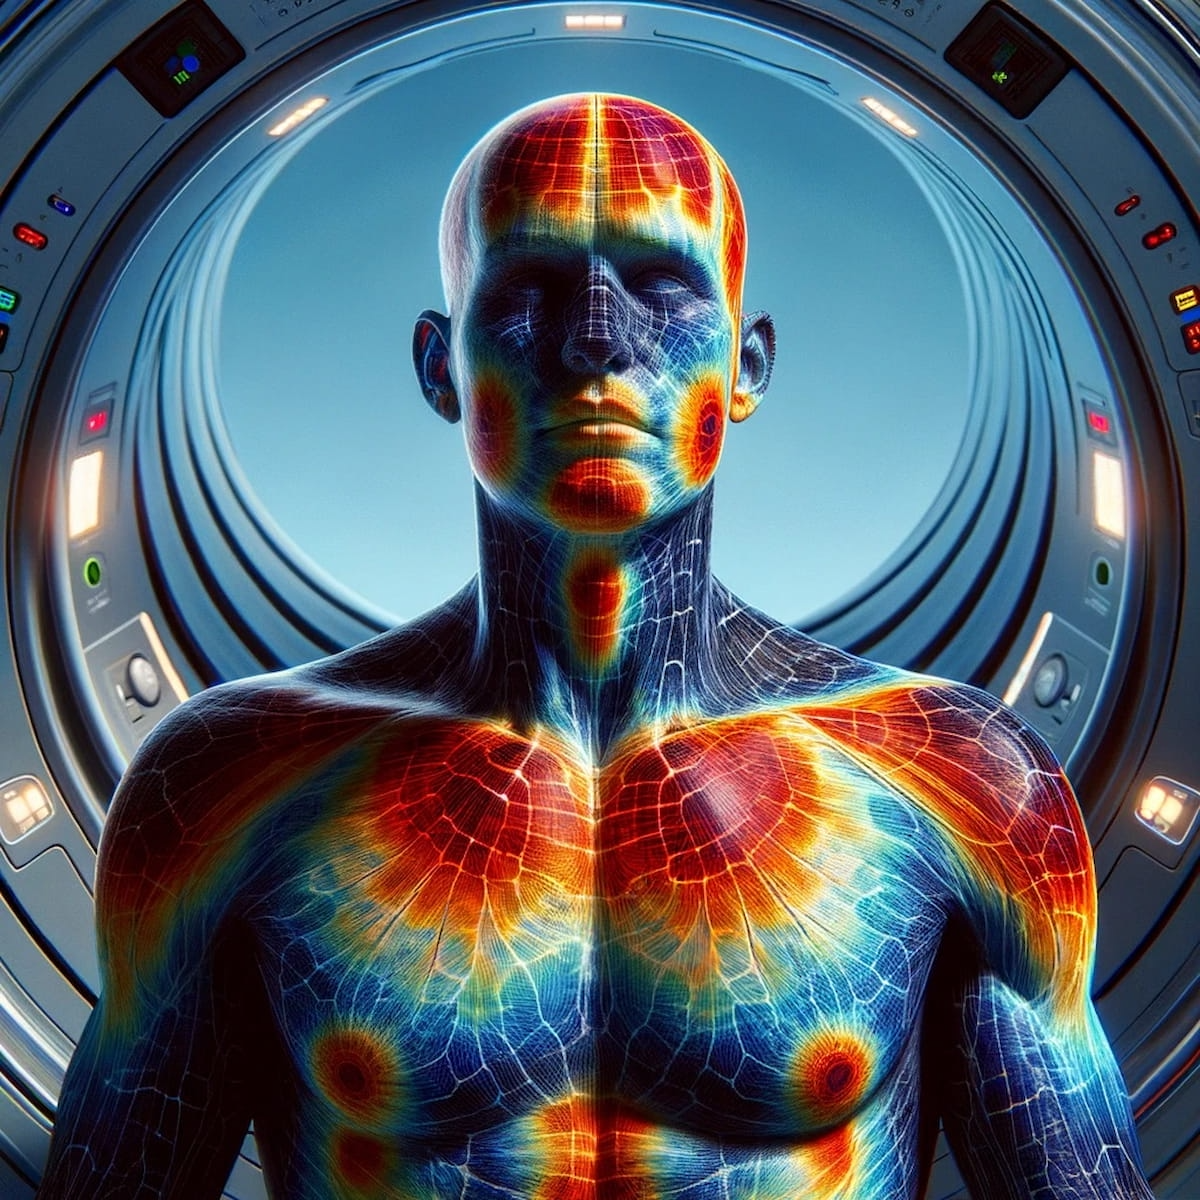
In an artistic rendering of the radiofrequency energy distribution that occurs during an MRI exam, thermal mapping highlights potential areas of greater exposure.
While typically measured as a single-value mass-average, SAR is actually inhomogeneous. The SAR is often higher at the periphery of the patient, proximate to the bore wall. If the patient has a lot of body mass, not only will he or she absorb more total wattage, but the patirent will also have more peripheral mass to absorb the extra watts in the regions of greater RF power deposition. This is why burns in patients are more likely in those who are obese, and may be — absent a potentiating electrical conductor — more likely in peripheral anatomy.
Based on these known factors regarding SAR estimation, we expect displayed SAR values to vary depending on the patient and the MRI system.
In summary, while keeping pulse sequence parameters constant, the displayed SAR value will differ between a small patient and a larger one, even if both are equipped with the same MRI conditional implant or device. Additionally, for the same patient with a specific MRI conditional implant or device, SAR values will vary across different MRI systems even with identical acquisition parameters, due to the different ways in which each system's software models patient absorption. The SAR estimates provided by MRI system manufacturers tend to be formulated with a conservative approach, albeit to varying degrees.
B1+rms reflects the average intensity of the positive rotating B1 field generated by the RF transmission coil during an MRI sequence, which offers significant advantages over SAR.
These benefits include:
• Greater precision. B1+rms, being directly correlated to RF field intensity, provides a more accurate estimate of energy available to produce heating.
• Independence from patient characteristics. Unlike SAR, which can vary considerably based on patient size or body composition, B1+rms offers a uniform and standardized measure of RF exposure, facilitating the adoption of safer and more consistent scanning protocols across vendors and systems.
• Better correlation with biological effects. Thanks to its direct relationship with RF field intensity, B1+rms is closely linked to potential biological effects of RF exposure, such as tissue heating, thereby improving risk assessment for patient safety.
We measure magnitude of B1+rms in microtesla because it is a very weak oscillating magnetic field compared to the 1.5 T or 3.0 T static field. Even though it is not specific to focal heating risks, B1+rms is superior to SAR for two main reasons: it is uniformly measured regardless of patient-induced variables. Many implants, especially electronic ones, require B1+rms restrictions to limit potential electrical currents induced within them. Adjusting some parameters, such as a flip angle or TR, will affect both SAR and B1+rms, but for very different reasons.
The integration of specific B1+rms limits in MR conditional device labeling allows clinicians to have more precise indications for safe use of these devices in combination with MRI exams. This measure, along with the optimization of scanning protocols to reduce RF exposure while maintaining adequate image quality, represents a significant step forward in ensuring the safety of patients with MR conditional devices.
Many standard protocols in normal operating mode may be compliant with the B1+rms limit of 2.0 µT without modifications, but it is important to note that there currently is no categorization of B1+rms values, alone, within SAR value classifications of “normal mode” and “first level controlled operating mode.” Protocols may require minor adjustments to remain within this limit. This optimization process may include increasing RF pulse duration, reducing the number of echoes (turbo factor or echo train length (ETL)), or adapting flip angle, with the goal of minimizing B1+rms and SAR without sacrificing image quality.
For medical devices that list both SAR and B1+rms conditions on MRI conditional labeling, B1+rms is often the preferred metric. However, if the labeling does not provide an “and,” “or” or “preferred” operator, explaining the device manufacturer’s criteria for choosing between the two RF measures, conservative local governing principles may hold that no operator presumes an “and” operator, and on-label imaging requires adherence to both SAR and B1+rms.
Final Notes
In summary, B1+rms emerges as a fundamental metric in the realm of MRI, enabling more precise and safer management of radiofrequency exposure, especially for patients with MRI conditional devices. This evolution in RF exposure assessment underscores the importance of a knowledge-based and technically accurate approach to improving MRI safety and efficacy.
Mr. Scappatura is a radiology technician at the UOC of Radiology of the Grand Metropolitan Hospital in Reggio Calabria, Italy. He is an integral member of both the multidisciplinary CAR-T therapy team and the multidisciplinary prostate cancer team.
Mr. Gilk is the founder of Gilk Radiology Consultants in Overland Park, Kansas, He is a board member and past chair of the American Board of Magnetic Resonance Safety (ABMRS).
Newsletter
Stay at the forefront of radiology with the Diagnostic Imaging newsletter, delivering the latest news, clinical insights, and imaging advancements for today’s radiologists.
Recent Videos


Related Content


